A Guide to the Grading of Natural Slate
Slates come in all shapes and sizes. Read on for an understanding of CUPA's natural slate tile selections and a guide to the natural slate grading on site:
When choosing the right slate for your roof, the higher the selection the more uniform the finished roof and the fewer imperfections. A first quality slate like the CUPA ‘R’ Excellence will provide a completely even surface. Natural slate is obviously a natural product and no two slate tiles are the same.
A ‘First Selection’ will require less slate grading on site and be less work and time for the roofer. But grading must always be carried out according to BS5534 recommend it is as best practice.
A standard grade slate CUPA ‘H’ selection will be less uniform and will require more sorting prior to use. But the finished project will look as good if due care is taken of the slate grading.
‘N’ is CUPA’s natural selection. It is perfectly fit for purpose, carrying the same certification. It simply requires more grading in order to achieve the desired finish. In order to see the difference in the CUPA selection it's helpful to visit one of our branches and view the products in the crates.
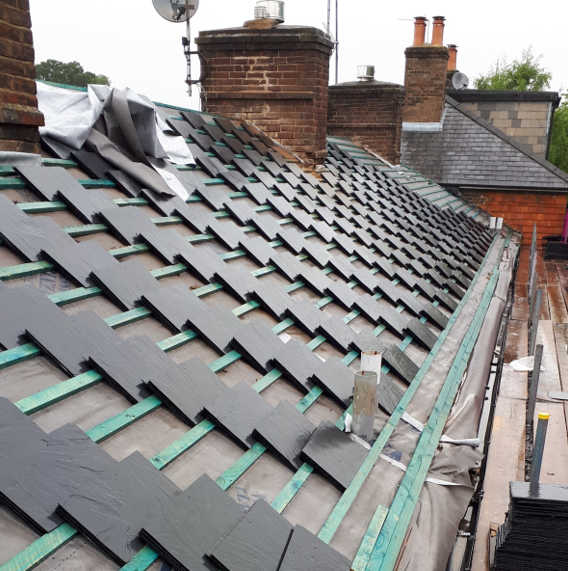
How to grade your slate on site
Once your materials have been safely delivered ready for installation, preparation is the key to success when dealing with natural slate. Whatever the size of your operation and workforce, slate grading is paramount to a better finish. It should never be overlooked.
Step 1
Firstly, before you start its worth recording the pallet ID (each crate label is barcoded). This is the traceability and will be required when CUPA issue any guarantee certificates. It will also give you proof and peace of mind that the CUPA slates are tested to meet the required standards (W1/S1/T1).
Step 2
If you work out the rough quantity necessary for each elevation (rather than just bumping straight from the crate to the roof) you can ensure that you stack the right grades in the right places on the roof or scaffold. This makes life easier when fixing.
Step 3
Before the slates are taken up onto the roof, grade them on the ground. With more space around you, you can sort the slates into 3 or 4 thicknesses. These should be placed where needed. During grading it is important to tap the slates to make sure they are sound and have a ‘ring’ to them. If there is a dull or dead sound there is probably a crack or fracture in the slate. CUPA slate are always checked as they are packed. However the journey from quarry to ship and then to your site may cause the odd casualty. Avoid the frustration of finishing the roof only to discover a broken or cracked slate.
Step 4
The grading is done by eye. When sorting into 3 thicknesses, thick, medium and thin, some will be bordering between the grades. This is perfectly normal and will blend well on the roof. Knowing how many you have of each grade, and rough quantities required for each elevation, will enable you to work out the amounts required in different areas of the roof for stacking out. Keeping the slate tile the same way up makes fixing easier and saves you picking up a slate and having to turn it round. If the slate is thicker at the top or head, it will be best used for a cut or eaves/top slate. There should not be many slates like this but if used on the roof it will cause the slate to ‘kick’ and may also affect the courses above.
Step 5
Thick slates are used on the lower (eaves) level of the roof and courses above. You move on to medium and then thin slates when reaching the ridge level.
You get great results when slates are graded and laid with care and attention. Time is money, but your slate roof will be up there for many years, so it is worth investing! Any queries please get in touch !