How To Buy And Use A Gas Torch For Roofing
A gas torch is essential if you want to lay a professional flat roof. The torch ensures a really good seal on the roof which will make it much more durable and therefore less likely to require repairs. Using a gas torch can be dangerous for an amateur, so please, if you feel you don’t have the necessary skills, hire a professional.
Propane is the most common type of gas for torching as it’s cheap and readily available. A professional self igniting torch is relatively 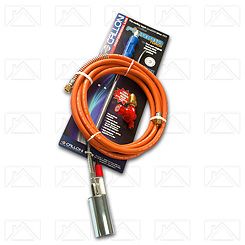 inexpensive and will cost in the region of £60-£70. For torching a roof you’re looking for a torch with a wide bell and long neck, this will allow you to stand upright and finish the job quicker as the area heated with each stroke will be wider. A long hose is also handy as this will attach to your propane canister and give you more freedom of movement. Ideally you want to use a larger propane bottle so you don’t need to keep replacing. Stopping and starting isn’t conducive to a tidy job. With a larger bottle you can complete each strip in a single go without moving/replacing your propane.
As with all roofing jobs, work diligently, don’t rush. Every roofer will have his own technique when it comes to torching a roof, and this is often developed over a number of years.
Safety First
A professional roofer will always protect himself with some basic kit while doing a job like this, this may include; protective gloves, goggles, flame retardant trousers, and safety boots.
On hand will be a fire extinguisher. Did you know a gas torch can reach temperatures of nearly 2000 degrees centigrade - it’s no toy! Some roofers will also keep a wet towel to hand to lay the gas torch on in between uses, this will protect work that’s been done and surrounding areas.
Laying A Torch Down Felt Roof
The make up of a torch down felt roof will usually be one or two layers of bitumen felt and a layer of mineral felt on top. The bitumen layers will be laid out first, ensuring that no two seams match up as this will weaken the seal and could lead to leaks. This base creates a smooth surface upon which to apply your mineral felt.
Before you begin, lay out the mineral felt on top of the bitumen felt to check where the overlaps will be - once it’s stuck down, it’s too late to plan these and modify!. You need 3 inches of overlaps on the sides and 6 inches on the ends. Once you’ve made sure everything will fit together as it should, you can roll the felt back up ready to begin torching.
Using A Gas Torch To Seal A Flat Roof
The felt is laid as a roll, the torch is passed over the adhesive underside of the roll to melt the adhesive and along the overlap in an L shape, it’s then rolled out so it sticks cleanly to the roof. You should angle the torch so both the roll and the laid felt are both receiving heat at the same time.
Around 70-80 % of the heat will be applied to the roll, with the rest going to the substrate (the layer the mineral felt is being stuck to, in this case the bitumen felt).
Note: on a colder day, the felt will take longer to heat, so use your instincts.
You can tell when you have heated enough as there will be a sheen that makes the felt look almost wet.
As you approach the end of your roll, you can hold up the final corner with a trowel before heating with the torch with one hand, and gently laying it with the trowel. You can then use the trowel to apply pressure along the seal. You’re looking for a slight bleed at the seams and this shows the adhesive has melted sufficiently. Apply pressure to all seams in this way - the seal is the most important part when laying your flat roof. If you have a seal that you’re not confident is completely water tight, you can heat your trowel and slide that between the two sheets and then pressing down.
This is a basic overview of how to lay a flat roof with the use of a propane gas torch, which is the ideal for large or professional roofs.